1.1 Requirements
- Microsoft 365 SharePoint Online (on-premises SharePoint Server is not supported).
- A modern browser: Microsoft Edge, Google Chrome, Mozilla Firefox, or Safari.
- Site owner permission on the target site, to run initial setup and open Settings.
- Recommended: a dedicated subsite (for example /sites/YourSite/RiskManagement) so that the application’s 13+ SharePoint lists remain isolated from other content.
- Optional: an Exchange Online mailbox for any user who triggers workflow notification emails.
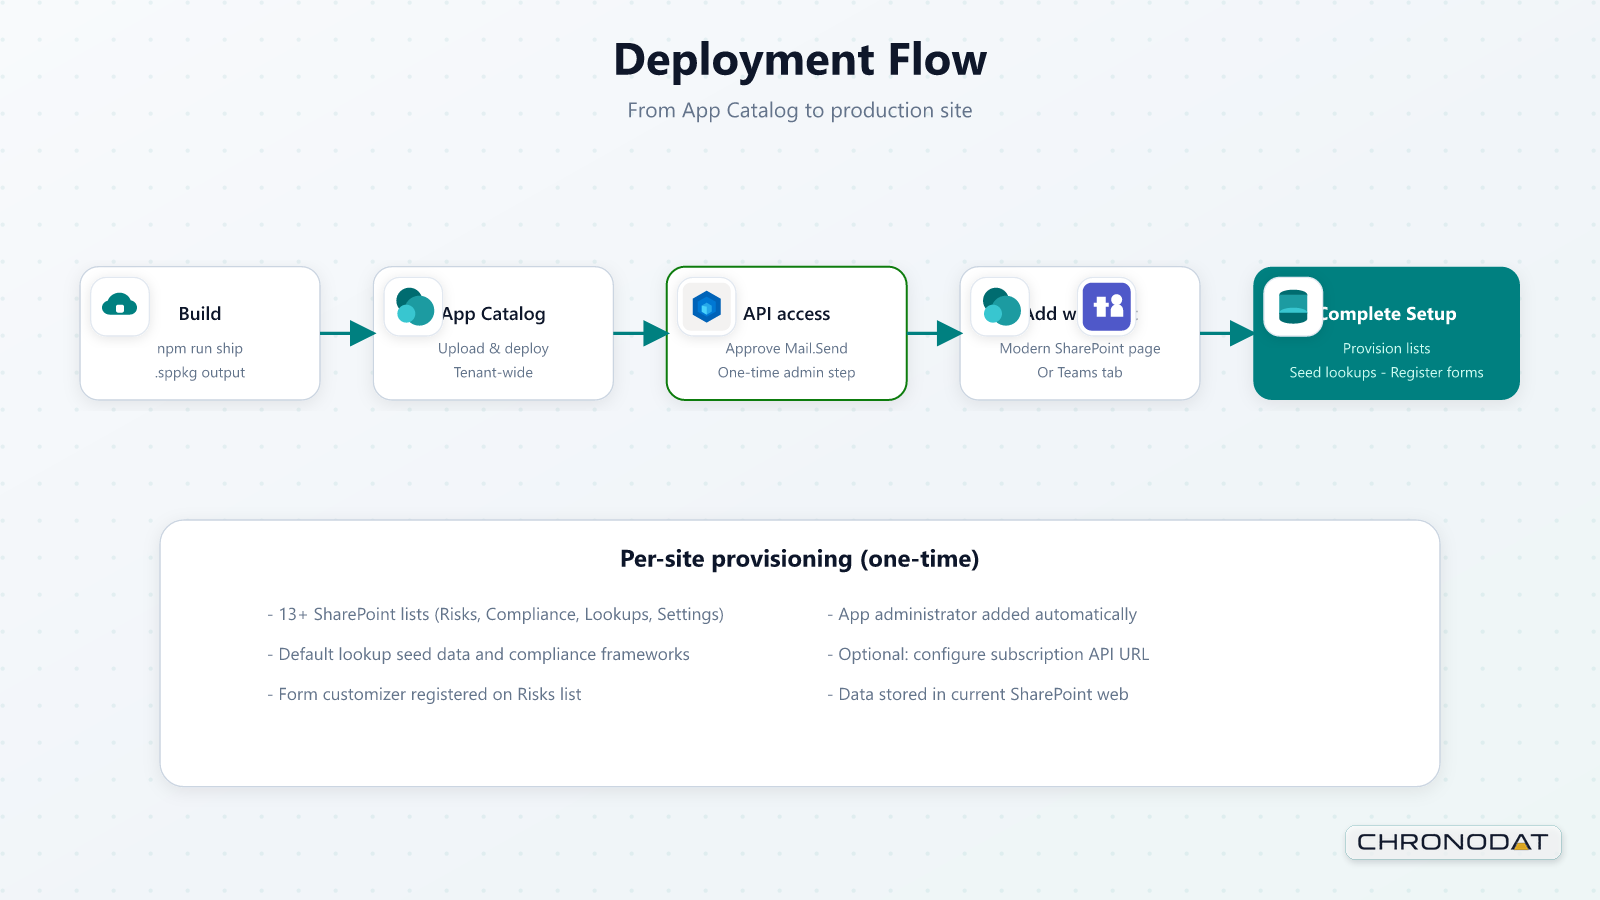
1.2 Deploy the App (Tenant Administrator)
- Build or obtain the production package sharepoint/solution/risk-management.sppkg (run npm run ship in the solution).
- Open SharePoint Admin Center → Apps → App Catalog and upload the .sppkg file.
- When prompted, deploy the package and make it available to all sites (skipFeatureDeployment is enabled).
- On the target site, confirm the app is available from the tenant catalog.
1.2.1 Approve Microsoft Graph Mail.Send (Email Notifications)
Workflow notification emails are sent through Microsoft Graph sendMail using the delegated Mail.Send permission. The application installs and runs without this approval — only email delivery requires it.
- Deploy risk-management.sppkg to the tenant App Catalog first; the pending permission request normally appears after deployment.
- Sign in as a Global administrator or SharePoint administrator.
- Open the SharePoint Admin Center (https://admin.microsoft.com/sharepoint) and go to Advanced → API access.
- On the Pending requests tab, locate Microsoft Graph → Mail.Send and click Approve.
- If nothing is pending, check the Approved requests tab — Mail.Send may already be approved for the tenant.
| Note Approval is one-time per tenant and is granted to SharePoint Online Web Client Extensibility. Users who trigger notifications need an Exchange Online mailbox; mail is sent from the signed-in user’s mailbox. If API access is missing from the admin menu, use PowerShell: Get-SPOTenantServicePrincipalPermissionRequests and Approve-SPOTenantServicePrincipalPermissionRequest. |
|---|
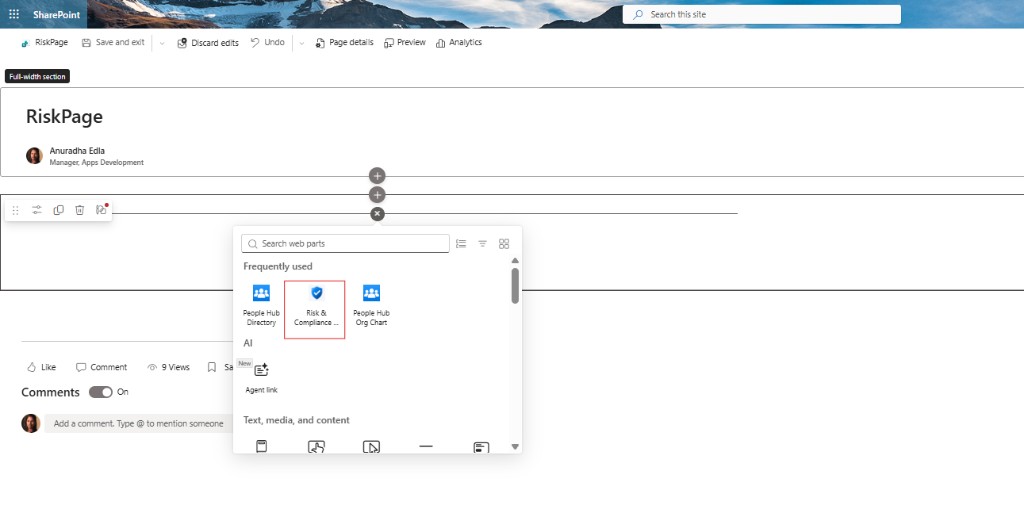
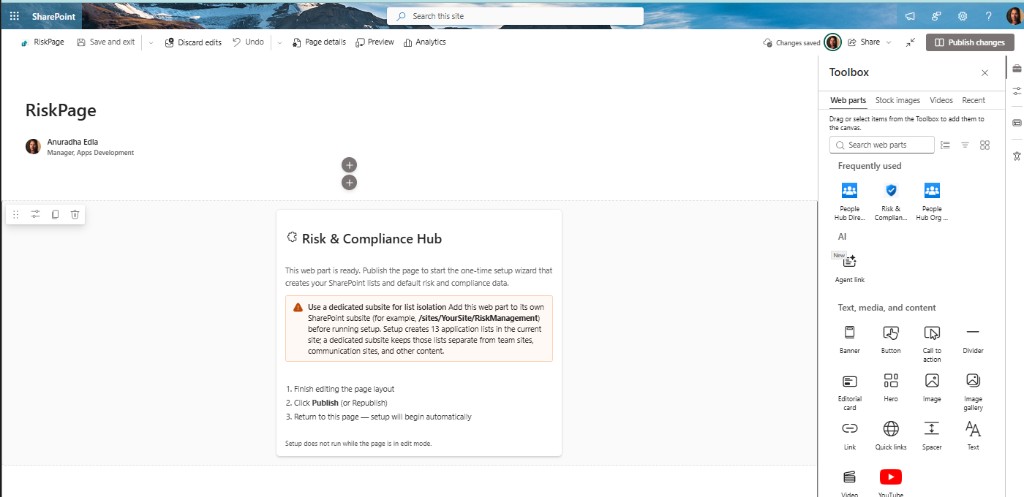
1.3 Add the Web Part to a Page (Site Owner)
- Create or edit a modern SharePoint page; a full-width layout is recommended.
- Select Edit, click + to add a new section or web part, and search for Risk & Compliance Hub.
- Add the web part and publish the page.
- Open the page while signed in as a site owner.
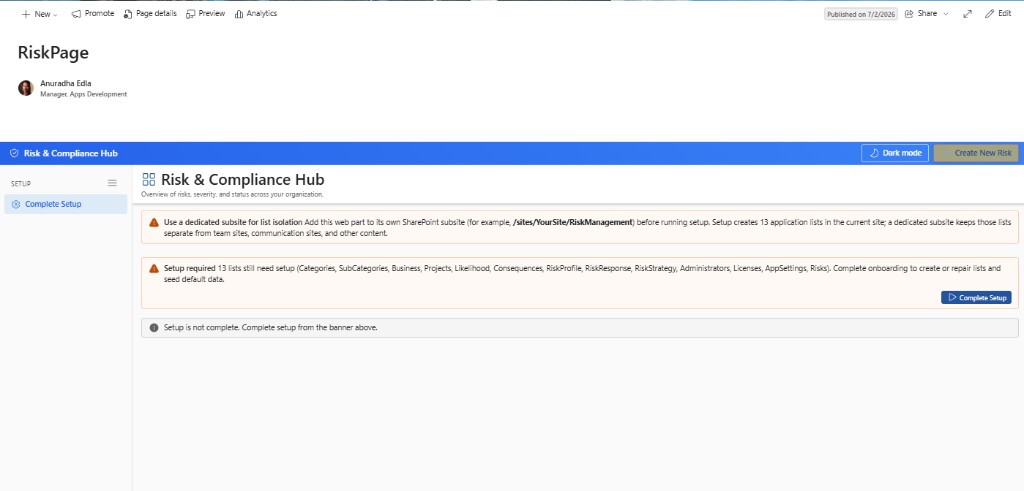
1.4 Run First-Time Setup
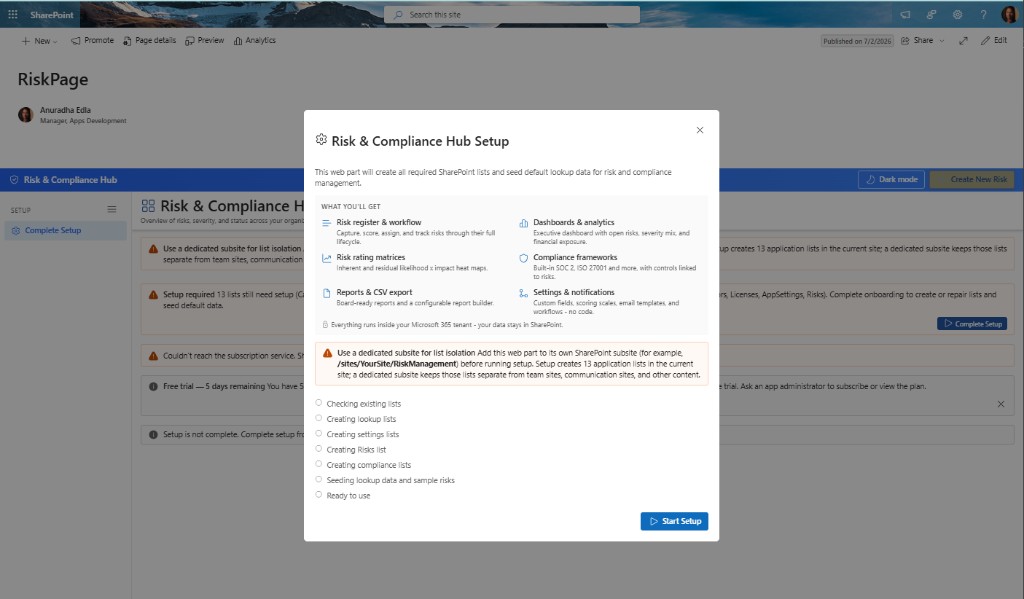
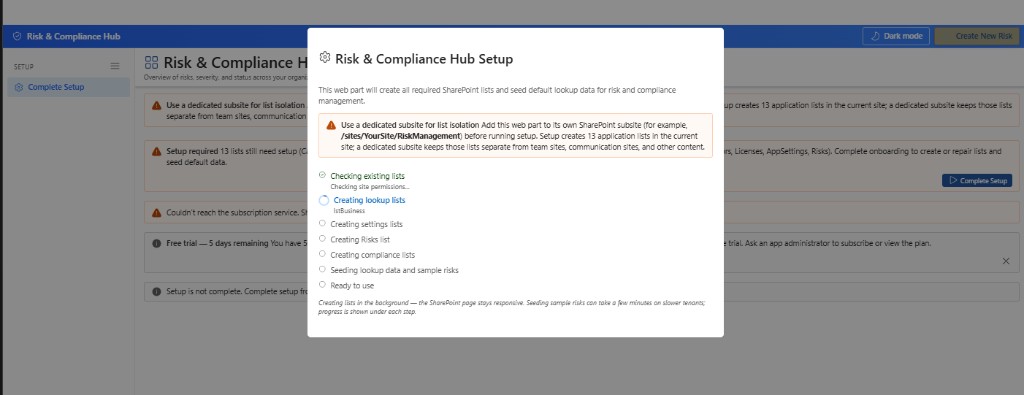
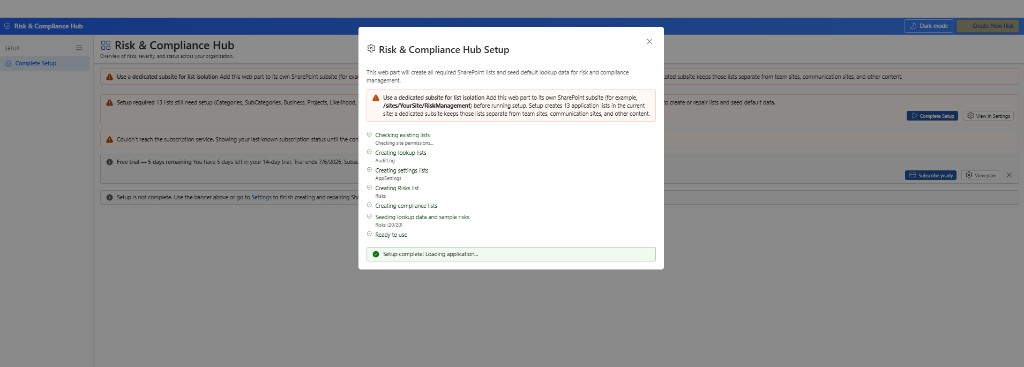
- When the web part loads, click Complete Setup on the banner (or open Settings and run setup from there).
- Wait while the app creates 13 SharePoint lists, seeds lookup data (categories, likelihood scales, compliance frameworks), and registers the risk form customizer.
- Confirm the banner reports that lists are ready — for example, All 13 SharePoint lists are ready.
- Open Settings → General to set the application name and an optional procedure document link.
- Open Settings → Appearance to choose the theme mode and colors, if desired.
1.5 Grant App Administrators (Optional)
App administrators can open Settings from the sidebar without being SharePoint site owners. The user who runs setup, or who first adds the web part, is registered automatically.
- Open Settings → App Administrators (visible to site owners and existing app administrators).
- Click Add administrator and search for a user.
- Confirm the addition, then click Save settings at the bottom of the page.
| Removing administrators When more than one administrator exists, click Remove on a row and confirm in the dialog. When only one administrator remains, Remove is disabled — at least one app administrator is always required. |
|---|
1.6 Roles and Permissions
| Role | Typical user | Can do | Cannot do |
|---|---|---|---|
| Site owner | SharePoint site collection owner | Run Complete Setup, manage SharePoint list permissions, open Settings | Grant Graph Mail.Send (requires tenant admin) |
| App administrator | Risk / compliance lead added in Settings | Open Settings; manage lookups, workflows, templates, and compliance frameworks | Change SharePoint site permissions unless also a site owner |
| Risk contributor | Business analyst, project manager | Create and edit risks, upload attachments, run reports | Open Settings or delete lookup master data (unless granted list permissions) |
| Risk viewer | Executive, auditor | View dashboard, lists, and compliance posture; export CSV | Create or edit risks (unless Add/Edit is granted on the Risks list) |
| Tenant administrator | Microsoft 365 admin | Deploy the .sppkg, approve Mail.Send, sync the app to Teams | Configure per-site Settings (done by the site owner on each site) |
SharePoint list permissions on the Risks list and lookup lists govern create, edit, and delete rights for end users. App administrators control configuration inside the web part only. Architecture diagrams illustrating these boundaries appear in Section 11.
Additional App Functionality
Visual Setup Walkthrough (Screenshots)
The screenshots below walk through the complete first-time setup: adding the Risk & Compliance Hub web part to a modern SharePoint page, publishing the page, and running the one-time setup wizard that provisions the SharePoint lists and seeds default data.
Setup does not run while the page is in edit mode. Finish editing, publish (or republish) the page, then return to it — the setup banner appears automatically for site owners.
Recommended Site Layout and Setup Checks
Use a dedicated SharePoint site or subsite for Risk & Compliance Hub whenever possible. The app creates and manages several SharePoint lists, settings records, app administrators, compliance libraries, audit entries, and optional sample data, so isolating the workspace keeps permissions, lifecycle, and reporting cleaner.
After first-run provisioning, open Settings and review Setup Status. This confirms that required lists exist and gives administrators a place to rerun setup checks if the app was moved, restored, or partially provisioned.
- Only seed sample data in demo or evaluation sites. Remove demo risks, controls, and lookup values before production use.
- Complete setup in the backing SharePoint site before adding the app as a Teams tab or personal Teams app.
- If setup warnings remain, resolve missing lists or permissions before users start entering production risks.
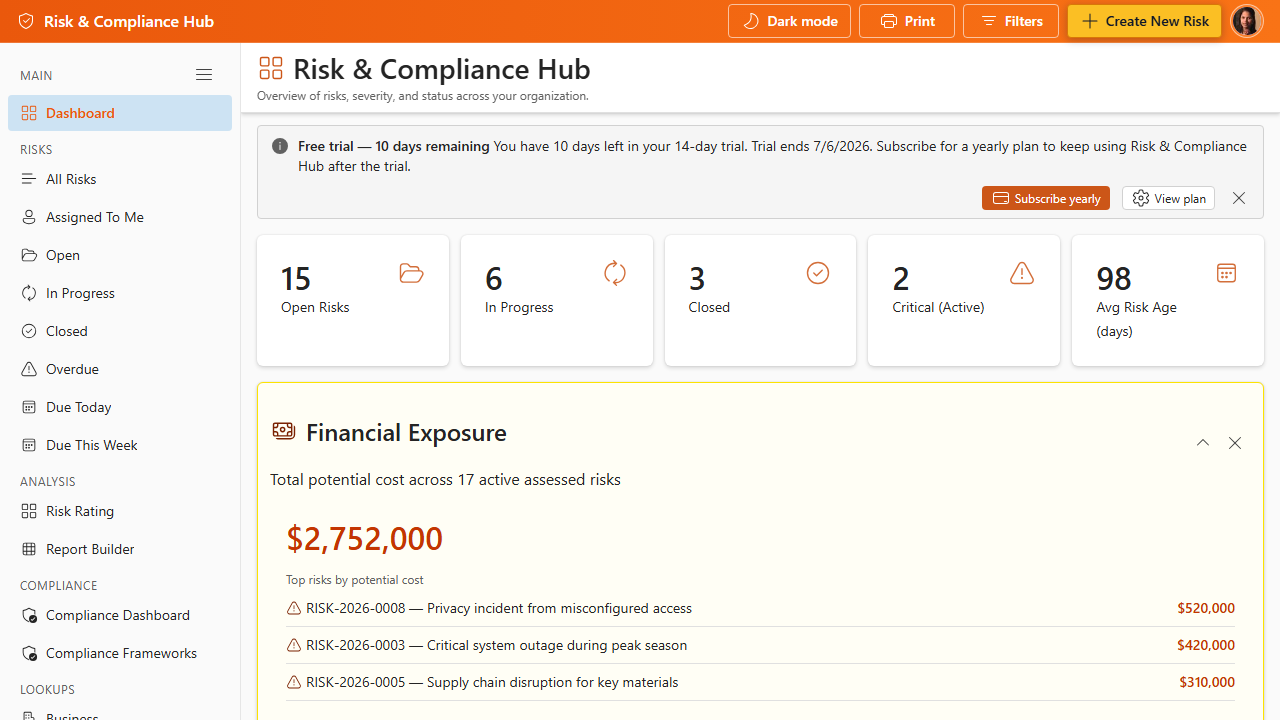
Subscription, Trial, and Access
Risk & Compliance Hub includes trial and subscription checks. During a trial, users may see subscription banners. If a subscription expires or cannot be validated, the app can show a paywall so administrators can review licensing before normal use continues.
Site owners or delegated app administrators manage licensing from Settings → Subscription. Keep the subscription API configuration and billing contact current so renewal and checkout flows work as expected.